

How To Build Wooden Bridges For Gardens
This diy woodworking project is about garden bridge plans. In this article we show you all you need to know about the construction of a decorative garden bridge, including the tools and materials required for the job. There are many shapes and sizes you could choose from, therefore we recommend you to plan everything from the very beginning. If you want to get the job done in just an weekend, a small scale project is perfectly for your needs.
You need o buy proper materials for this project, therefore we recommend you to invest money in quality materials. The bridges construction requires two stringers built from 2×10 or 2×12 beams, so make sure they are perfectly straight and don have any visible flaw. Drill pilot holes in the components, at least 1/2" from the edges, if you want to prevent the wood from splitting.
Projects made from these plans
- Materials
- Tools
- Time
Diy Garden Bridge Plans
Arched-bridge-plans-free
Building a garden bridge is a nice project, that could add value to your property and enhance the look of your garden. If a stream of water runs along you property or if you just want something unique, you should consider building an arched wooden bridge.
Top Tip: If you want to save some money and to learn new carpentry skills, you should build the bridge by yourself. The most important part of the project is cut the stringers properly, therefore you have to draw the cut lines in a professional manner.
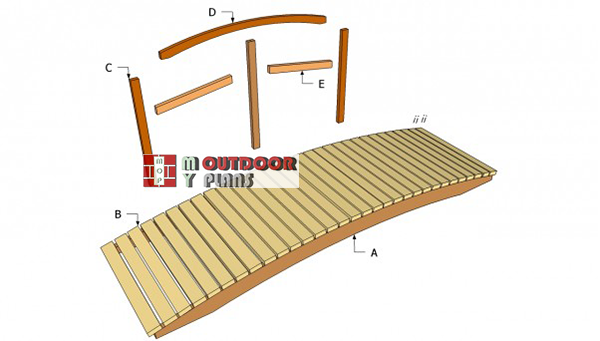
Free Garden Bridge Plans
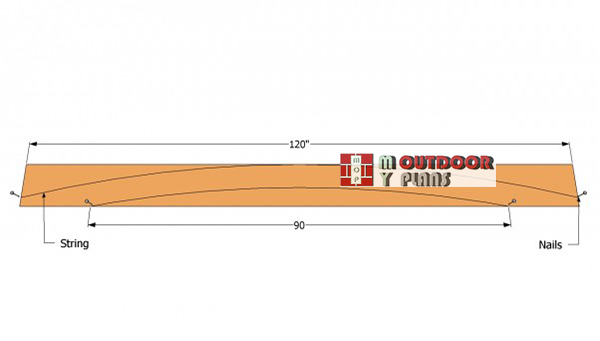
Drawing-the-bridge-stringers
First of all, you need to build the stringers of the bridge, made of 2×10 or 2×12 beams. In order to draw the arches, you could either free-hand trace the arch or use nails, a string and a pencil. As you can imagine, the second method is easier, provided you place the nails properly.
Leave at least 15" from the end of the boards, in order to obtain a good support. If you don't build the supports, it won't be able to support the weight.

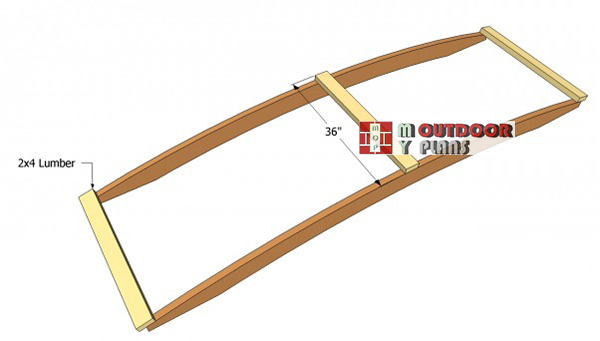
Building the stringers
After you draw the cut lines on the beams, you should make the cuts, using a jigsaw with a sharp blade. Make sure the blade goes exactly over the cut lines, otherwise the stringers won't have the right shape.
Top Tip: After you perform the cuts, you should sand the edges with medium-grit sandpaper. Work with great care and attention, if you want to obtain a professional result.
Arched-bridge-slats-plans
The next step of the woodworking project is to install the 2×4 slats. First of all, you need to secure the frame of the arched bridge in several places, as in the image. In this manner, you can make sure the stringers are plumb and equally-spaced.
Top Tip: Place the slats at both ends of the bridge, making sure they overhang at least 2". Drill pilot holes in the slats and insert several 3" deck screws.

Installing the slats
Install the rest of the slats, in the same manner as described above. Make sure the slats are equally spaced, leaving at least 1/2" between them. Drill pilot holes in the slats, at least 1/2" from the edges, to prevent the wood from splitting.
Top Tip: In order to make the whole structure more rigid, we recommend you to install several slats under the top of the bridge. Work with great judgement and patience, if you want to obtain a professional result.

Garden-bridge-rail-plans
Building railings for the arched bridge is an optional step, but it would definitely add character to the construction. If you want to build a simple rail for the project, you could attach it on one side of the bridge.
Build the top of the railings in the same manner as the stringers, but round the edges with a router and with a 1/4" bit. Plumb the rails with a spirit level, before securing it to the stringers with lag screws.

Garden bridge plans
After you have built the garden bridge, you should take care of the finishing touches. Fill the head of the screws with wood putty and let it dry out thoroughly. Afterwards, sand the wooden surface with 120-grit sandpaper.
Top Tip: Protect the lumber from rot and water damage, by applying several coats of wood stain or paint. Work with great care and good judgement, if you want to build a bridge with a nice appearance.
This woodworking project is aboutdiy garden bridge plans. If you want to see more outdoor plans, check out the rest of our step by step projects and follow the instructions to obtain a professional result.
How To Build Wooden Bridges For Gardens
Source: https://myoutdoorplans.com/bridge/garden-bridge-plans/
Posted by: ericksonforkabounce.blogspot.com
0 Response to "How To Build Wooden Bridges For Gardens"
Post a Comment